Congrats, you have made your app. Now it’s time to introduce it to the world. What better way than to publish it on the largest application platforms in the world- The Google Playstore. When you publish your app through playstore, you get access to a suite of developer tools. They let you analyze data such as the number of downloads and recognize market trends. Not to mention the various revenue-enhancing features such as in-app billing and application licensing.
Did you know - How Many Apps Are on Google Play?
The Google Play is one of the most popular mobile app vendors on the planet, 3.19M APPS
If this is your first time, apart from the thrill of publishing your app, it is also extremely natural to feel overwhelmed by the whole process.
Don’t worry, we will simplify it for you. So here is your detailed step-by-step guide on how to successfully publish your app on the playStore.
Step 1 - Creating a developer account
First things first, before you publish an app on the playstore, you will need to create a developer account.
- Go to “Google Play Console” and sign in thru your Gmail account.
- Click on create a new developer account.
– Provide the necessary details. - Pay a one-time registration fee of $25.
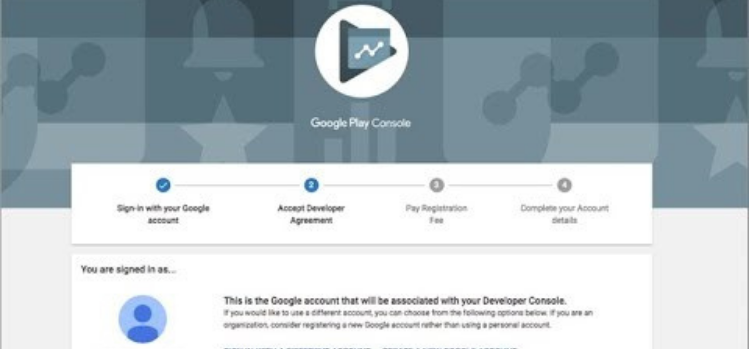
That’s it, you have created a developer account.
Things to keep in mind
- The developer’s name you choose will be visible to the customers on playstore.
- Google may ask for your valid ID proof – eg – aadhaar
- If your app has “in-app purchases” then you will need to set up a merchant account as well
Usually, it takes no more than two days to get approval. Also, don’t worry if you forget to add some information. You can always edit your account later.
Great, now let us begin to Publish your app on Playstore.
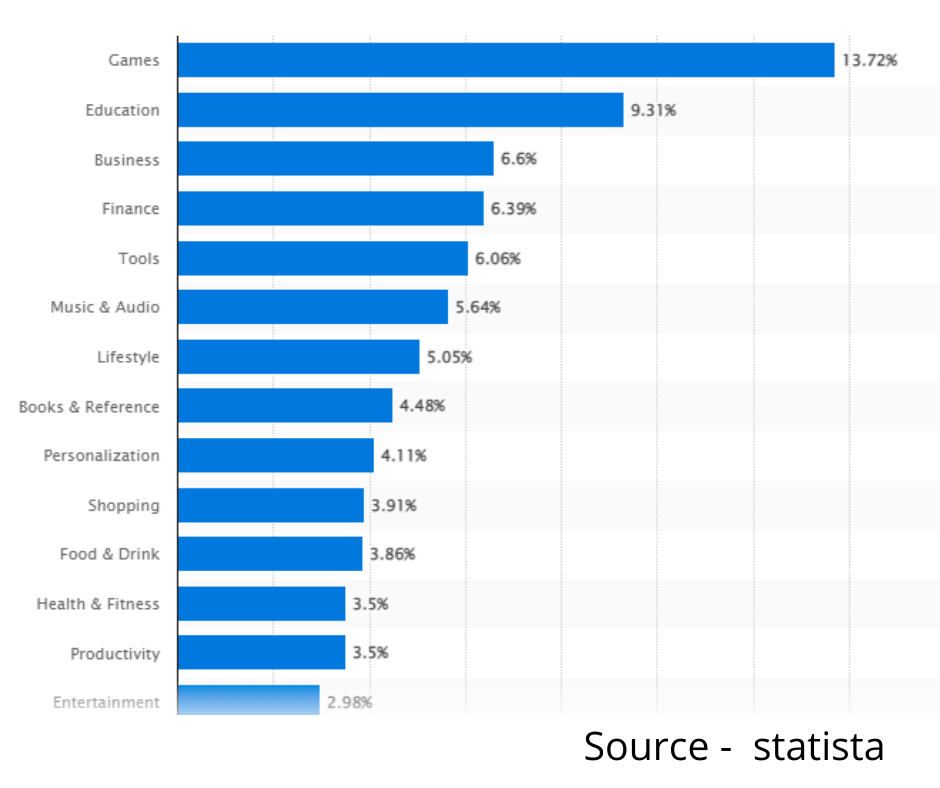
Did you know - What are The Most popular Google Play Store App Categories
Step 2 - Prep work
Based on our experience It is always time-saving and prudent to keep the following materials handy beforehand.
Graphic Assets
- 1. Your Logo – App icon (512px x 512px. Format: 32-bit PNG. File size – 1 MB)
- 2. Your banner – Cover image (1920x1080px Format: 24-bit PNG. File size – 1 MB)
- 3. Screenshots of your application (Format: 32-bit PNG. File size – 1 MB)
- 4. Video of your app – Preferable but not compulsory (Format: 16:9. Duration – 30 sec)
This will be used in Step 5 – Prepare Store Listing
Technical data
1. Create your Andriod Application Bundle (AAB) file – The AAB file is a publishing format for Andriod. It has many things, including a base APK (Andriod Application Package). This APK contains all the elements needed for your app to work on an end-user device. It also has multiple split APK’s (smaller units).
Google then uses this app bundle to generate and serve optimized APKs based on each user’s device configuration. The user downloads only the code and resources they need to run your app. Up until Aug 2021, developers could directly upload APK files to Playstore for distribution. However, after the release of the new AAB format, Google has urged developers to switch to this new format. This can be done using Android Studio 3.2 or later.
The below diagram explains how it works.
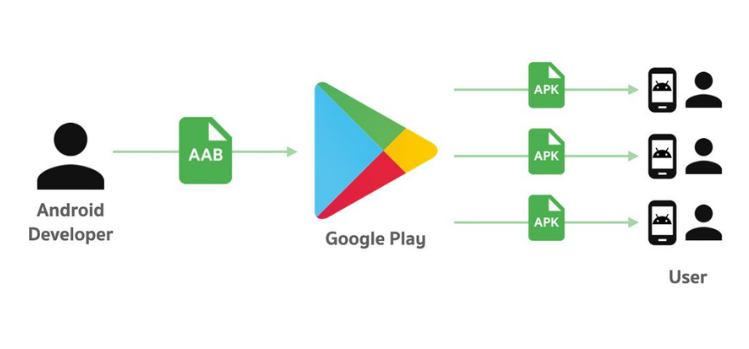
Google set the limit size of the uploaded file to 100MB (Android 2.3 and higher). 50MB for lower Android versions. You can use up to two (2) APK Expansion Files, each up to 2 GB in size, for each APK.
We will use this in Step 6 – Release the app
Did you know - How Many Apps Are on Google Play?
The Google Play is one of the most popular mobile app vendors on the planet, 3.19M APPS
Key Documents
- Privacy Policy – A clear privacy policy will explain to the app users what happens to the personal information that you collect from them. Even if your app doesn’t collect personal data from users, we recommend to publish this policy.
- End User License Agreement – is an agreement between you as an owner of the app and an end-user of your product. The policy details what users can/cannot do with the app. It also protects you from any intellectual property thefts. We recommend to publish this as well.
We will use this in Step 4 – Set up your app
For both of these, you can use existing documents from similar apps published in playstore as references. There are also numerous websites such as Termify and Firebase that help you create these documents.
Things to keep in mind
a) Graphic assets are the first thing a customer sees on Playstore. It should be attractive as well as informative. b) We suggest you check the Google Playstore website for the latest update since these policies keep changing. c) Privacy Policy and EULA are not compulsory documents; however, we recommend you have them in place for your protection. Once you have all this in one folder. We are finally ready to publish your app.Did you know - How Many Apps Are Published on Google Play per Day?
An average of 1,840 new apps are released on the Google Play per day.
Step 3 – Create application
We start by visiting the Google Play Console. You will arrive at the Dashboard.
- Reach to All applications tab in the left-hand side menu.
- Now select Create Application.
- Choose the app’s default language from the drop-down menu.
- Add a brief app description (again – you can change it later).
- Tap on Create.
Once you have done that, the Playstore console will guide you to certain compliances. Before you publish your app on the playstore you need to agree to the following compliances
a) Developer Program Policies – when you click here, you confirm that your application meets the defined criteria (What is this?) This is critical as noncompliance to these policies would mean suspension of your app from playstore.
b) US Export Laws – this is the second compliance every app developer has to agree which states that the app adheres to US export laws (What is it)
Things to keep in mind
- It is a good practice to read the Developer Program Policies and US Export laws before you agree to them and publish your app on playstore
- Google has strict rules which if not followed could lead to a suspension of your application from playstore. Google could also suspend your developer account. Mentioned below are some of the top reasons of suspension.
Once you provide all this information. You can click on create an app which will take you back to the dashboard.

Step 4 -Set up your app
In the Dashboard, you will find a section called “Set up your app”. Inside this, if you click on view tasks, you will see some pre-defined tasks. Each of these tasks needs to be completed and saved.
We will go through this one by one.
- App access – Is the entire functionality of the app available to the user? or is there a particular functionality which you want to be restricted. Eg – Headspace is an app that restricts certain functionality for its free users and only paid users have full access.
- Ads – In case you intend to showcase ads in your app. Even third-party ads. then you click on Yes, otherwise No.
- Content rating – Google will give you a content rating based on the information you provide through a questionnaire.
- Privacy Policy – As mentioned above, even though it’s not compulsory, it’s good practice to add one.
- Target Audience – Define what age group are you targeting.
- News app – if you are uploading a news app then, you will have to provide additional details.
Once you have done this – click Save and go back to the dashboard.

Things to keep in mind
• If you select YES – under the Ads section. Then a banner – “This app contains ads” will appear beside your app logo in the Playstore.
• Content rating will also appear beside your app logo in the Playstore. The ratings your app has in different countries will differ (you can change this later)
The next set of tasks are related to how your app is organized and presented to the customer in the playstore
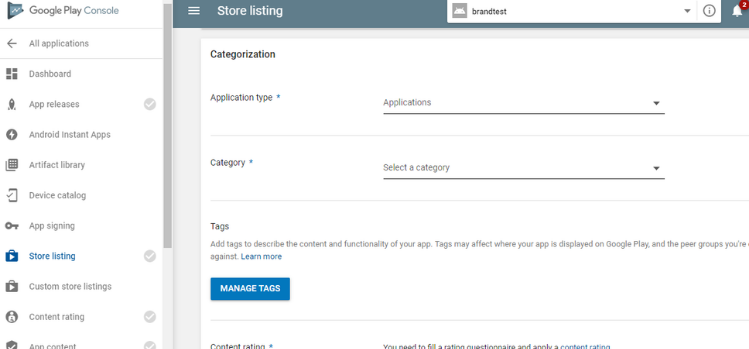
Step 5 - Prepare Store listing
This section is perhaps the most important as it gives the users all the information about your app. It also has information useful for App Store Optimization (ASO). We recommend that you use keywords that will help the users find your app easily. However, at the same time be as truthful and transparent as possible here.
- Application category – Through the drop-down menu, select the application type: game or app. Then pick the category that your app fits into.
- Provide your contact details – Here you can provide your support service contacts. It is mandatory to at least give one email address.
- External marketing – This is free advertising by google, so we recommended keeping it ticked.
- Main Store listing – This is where all the preparation that you have done in Step 2 comes in handy.
- 1. A short description – It contains a title of your app (up to 50 symbols), a brief description (up to 80 symbols), and a full description (up to 4000 symbols). As mentioned above keep these descriptions honest with the help of keywords. Overdoing keywords makes your app look fake or spammy.
- 2. Graphic Assets – Time to take out all the assets we prepared such as the App icon, the banner, the screenshots, and the video. A person may or may not read the description but he/she will surely look at the graphic assets. Hence these assets are the first impression.
Once you have uploaded all the necessary graphic assets in the format specified, click save. Go back to the dashboard
Things to keep in mind
• Tags although not a mandatory requirement is a very useful ASO (App Store Optimization) tool. We recommend that you choose all 5 tags describing the content and functionality of the app.
• Playstore will publish the contact details that you will provide. Filling in details such as website URL, email, and phone makes it easier for the users to contact you.
Step 6 - Release your app
Back on the dashboard, you will find the section “Publish your app”. Inside this, if you click on “view tasks” you will find a list of pre-defined tasks. Click on the first task “Select country and region”
Before you start this step, please keep in mind that this is the “production” environment.
If this is your first time, we highly recommend you start with testing your app in smaller groups before releasing the same directly to production. Pre-release testing allows you to gather people’s opinions, test your app with a broader audience, and fix issues before publishing the app and make public.
- Test your app with a small group – Internal testing (this is for up to 100 users). Usually, if you want your internal team to test the app for bugs etc
- Test your app with a larger group – Closed testing (this is for a higher number of users). Usually, if you want to give your app for testing to a larger group of people or maybe build excitement for the app by giving invitation-only access, pre-registration access, etc
Whichever environment you decide to publish the app on, whether it is Internal testing/Closed Testing or Production. The below tasks are the same.
Let’s go back to the first task in the section “Select country and region”
- Select the countries, where you want the app to be published from the drop-down menu.
- Click on Release
o Create a new release – This will open a new page
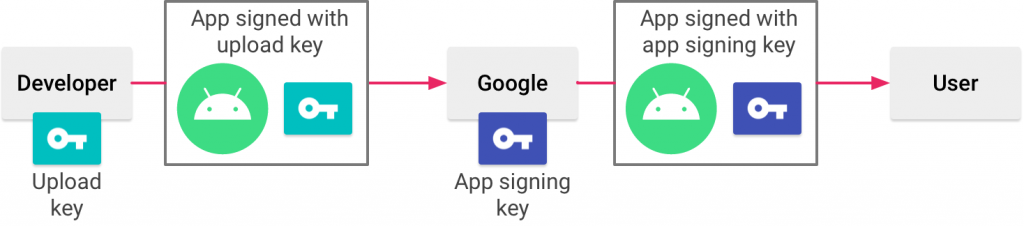
This is where you have to upload the signed AAB file/bundle which we created in Step 2. You will see that the option to upload the .abb file is not highlighted yet. It is because you have to first digitally sign your app bundle before you publish it.
This is done as a means of security and identification, in the future if you want to update this app, Google will recognize the update has come from you (the rightful owner of the app). Play App Signing uses two keys: the app signing key and the upload key. While you keep the upload key, there are 2 options for creating and managing the app signing key.
- Do you want to manage the app signing yourself?
- or let google manage the app signing for you?
We recommend choosing, Google-managed app signing, because of the numerous benefits it offers. To name a few Google Play’s advanced delivery mode, the flexibility to change your app signing key in case your existing one is compromised, and the increased security of having a separate upload key.
The way it works is explained in the diagram below.
This selection is mandatory to move forward.
- Click continue to let google manage the same for you.
- Now the Upload link is highlighted.
- Click Upload
- Find the – .abb that you had created, from the computer.
- Give it a release name and add some release notes eg – version 1.0 & New App.
- Click Review Release, you are almost there.
- A summary page opens – which displays all the details along with any warnings or error messages.
- Finally, click – start rollout to production,
- Google will ask you again for one final confirmation – Click Rollout.
Finally, its done…
Did you know - What Is the Distribution of Apps Versus Games on Google Play?
429,061 are gaming apps and 2,757,017 are non-gaming apps.
Congrats, your app has been submitted to be published on playstore. Please bear in mind that this is a submission. The team will review this submission before releasing it in the app store. Realistically it takes up to 2 days, however, Google says the review process could take up to 7 days or even longer.
You’ll receive a notification on Google Console, once the app is reviewed.
Reasons for app rejection
Building an app is hard work in itself, the last thing you want after going through the entire process is to have your app rejected by Google. Since it is always better to be safe than sorry, it is imperative you know the possible reasons why Google could reject your app
Here are the top 3 reasons :
- Plagiarism – Google has an extremely firm policy on plagiarism. There are high chances that google will reject your app, if your application name, logo, description, or any part of your application code is copied. You could have done it by mistake as well, hence please ensure your app is unique in every possible way. In case you are using any copyrighted materials (including trademarks), make sure you have permission from the owner.
- Bugs – Google review process is thorough; so your app will be tested under certain parameters. If during the review process, the team identifies bugs or issues while performing the basic functions of your app, then be rest assured that they will reject your app. Google has to maintain the quality of the apps offered on the platform for the users. Test your app in all sorts of scenarios before you submit
- False or Missing information – All the details you provided while publishing your app, eg – content rating, policies, etc needs to be true and complete. If in the review process Google realizes that the information given is different from the actual content on the app, or if you have not provided important information eg – Privacy policy. Then the chances of rejection become very high. Google will give you a second chance to change the content rating, so please ensure no false information is given while publishing the app.
Please keep in mind, you will be given 3 chances, if your app is rejected the 3rd time – then your google play console account could also be suspended.
Now you know the reasons and can take the appropriate measure to successfully release your app. All the best.
Conclusion
We hope the article was useful in helping you publish your app on the Google Playstore. Remember that the journey does not stop at publishing. Running a mobile application is a process of continuous improvement. Persistent effort is required to keep it trending otherwise, competition will overshadow the app.
Watch this space for more such articles

Add comment